How to Process a Postal Mail Marketing Effort

If/and when the naming convention CDAG is used in this article, substitute with the naming convention unique to your school/college/unit. A full list can be found at https://dar.uga.edu/index.php/gail/gail_naming_conventions
*** 2 Options for Creating a New Marketing Effort:
- Copy an Existing Marketing Effort, edit name of effort, update all aspects with appropriate settings.
- Create a New Marketing Effort using one of the Communication Templates based on channel
- Complex Mail Template (for Postal mailings)
- Simple Email Template (for email distributions)
 Creating a new Marketing Effort from Template
Step 1: Establish the Prep – package, creative, etc.
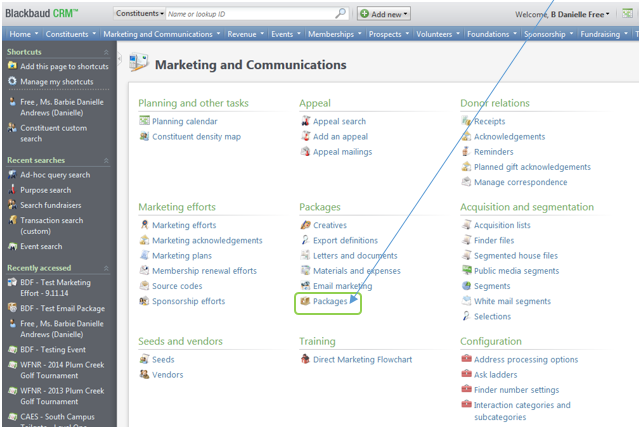
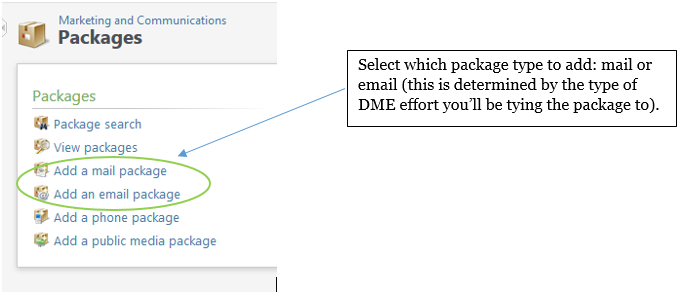
Create the Package – Navigate to the Marketing and Communications functional area and click packages.
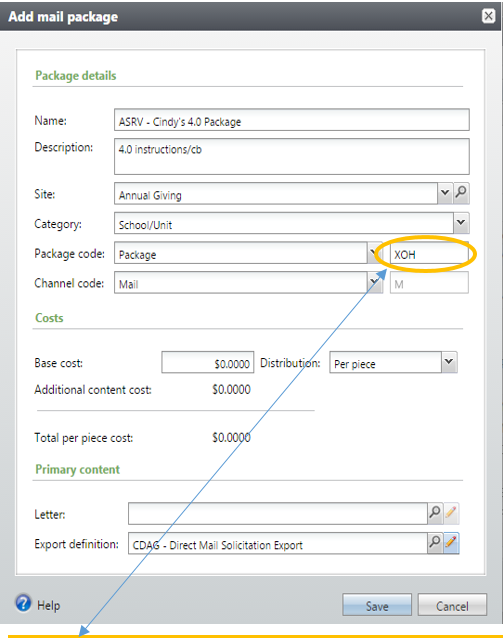
In Training – Only one person can select Package Code at a time –
then save so other trainees can get a unique code.
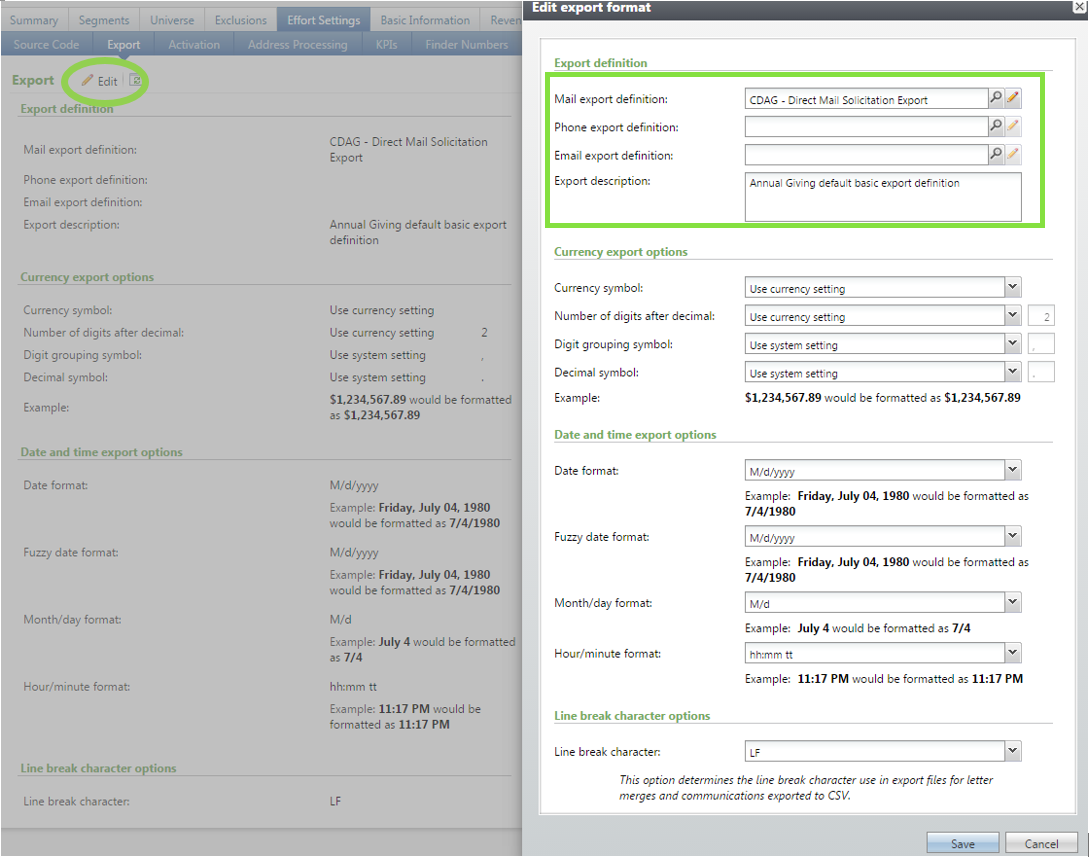
*An Export Definition refers to the fields that will display in your output i.e. lookup ID, name, spouse, address, phone, email, etc. You may choose to use a basic export definition such as CDAG – Direct Mail Solicitation Export or you may elect to use an export definition created specifically for your school/college/unit.
**A message refers to an email message that’s been created within GAIL using the “Email Marketing” section. For more information, refer to the “creating email messages in GAIL” instructions.
Add Creative(s) – After you create and save your package you will automatically be taken into the package details screen. From here you will add your creative(s) if you have them ready. Click “Add”.
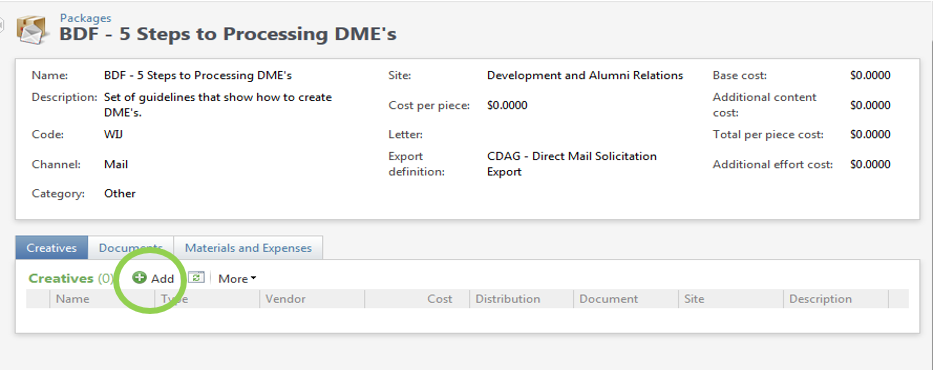
A search box will appear. You can search for and select a previously created creative or you can add a new creative by clicking “Add”.
**Use the search criteria options in the search box to search for an existing creative, or if you need to create a new creative click “Add”.
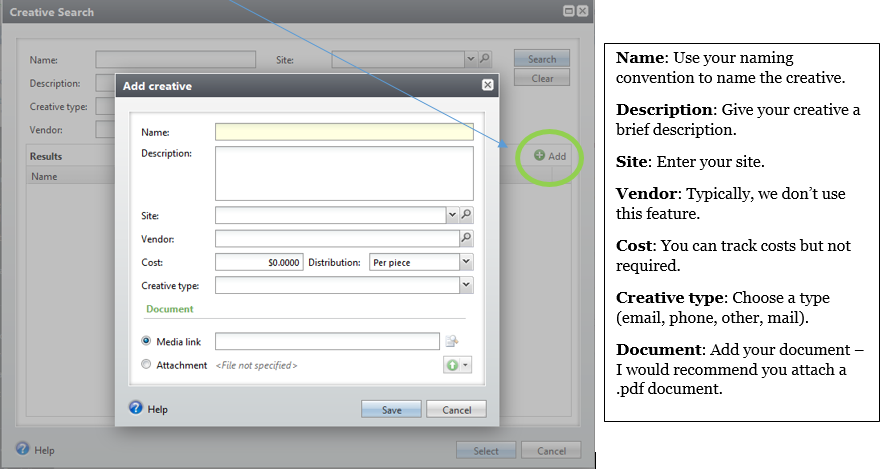
When you click “Save” you will automatically be redirected back to the Package details screen. Repeat this process until you’ve added all the necessary creatives.

Step 2: Identify the Audience – segment
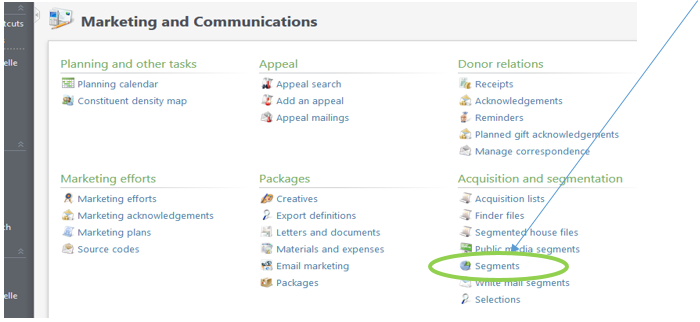
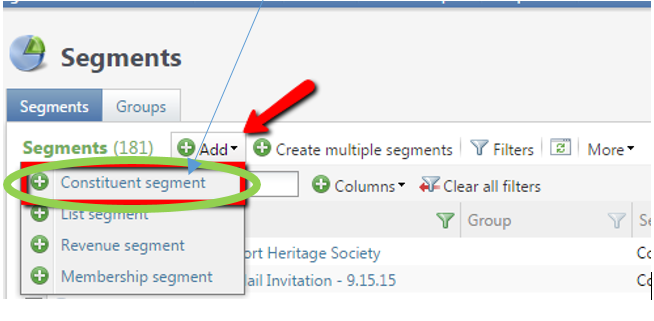
Create the segment – Navigate to the Marketing and Communications functional area and click segments.
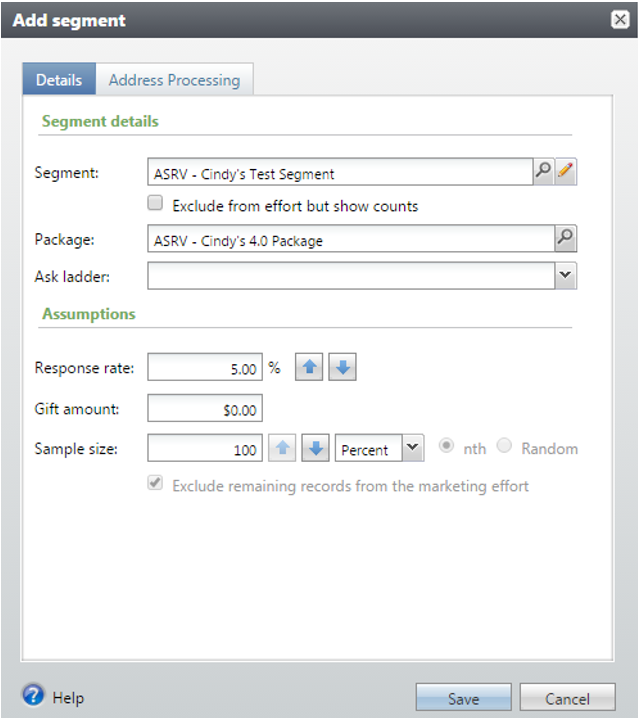
Choose “Add a constituent segment”**.
**A segment is made of a selection, generally provided via ASKIT per your request. Typically, you’ll add one selection per segment. Remember, you can add multiple segments to your marketing effort.
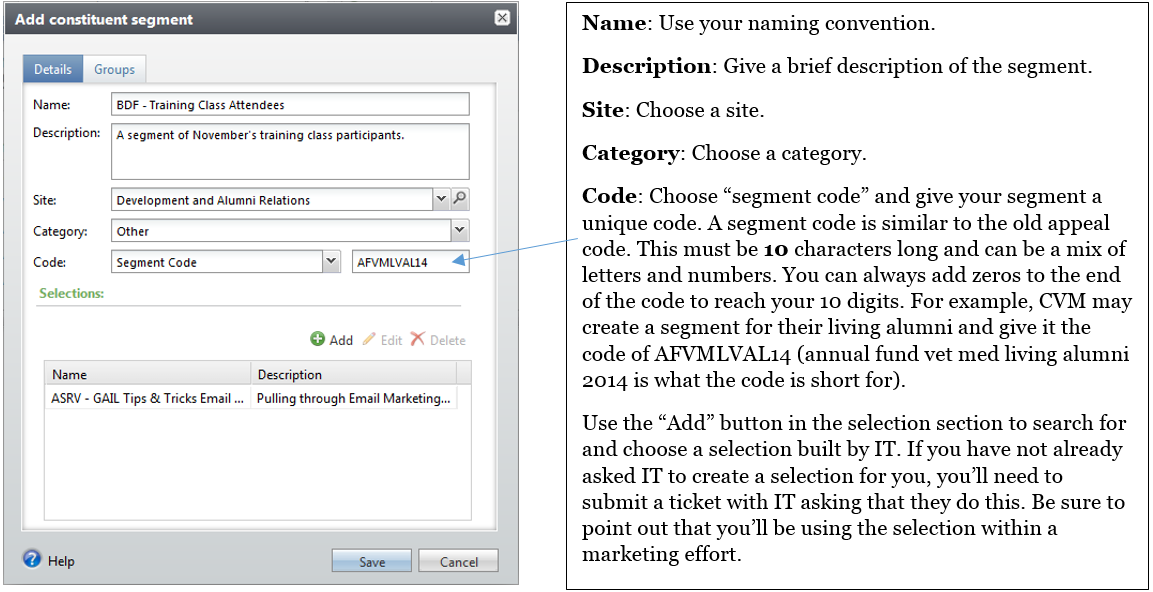
TIP: If you want to get everyone from your Selection into the effort, only pull in one Selection per Segment and build as many segments as you need for each of your Selections.

Step 3: Create the Direct Marketing Frame
Create the Direct Marketing Frame – Navigate to the Marketing and Communications
functional area and click “Direct Marketing Efforts”.
Choose the “Add” button then choose “Complex Mail Template” for postal, or “Simple Email Template” for email, or “Multi-Channel Template” for a combined channel effort.
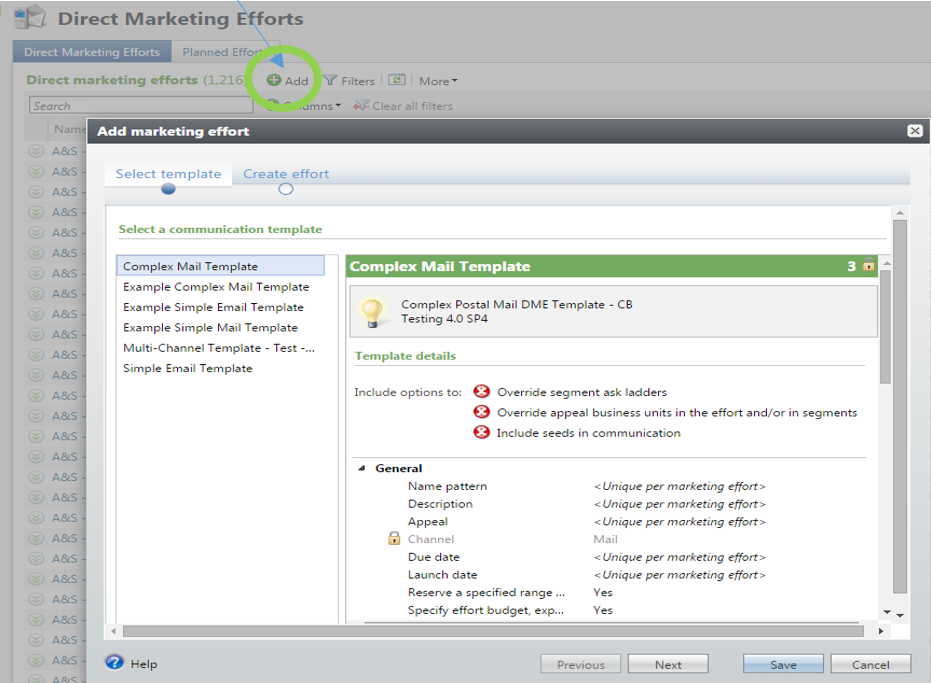
When creating a marketing effort, you’ll navigate through options and insert the appropriate information – Please see each option screen below. Check and update options for each page and click Next to move through.

Click Next to go to the next screen below.
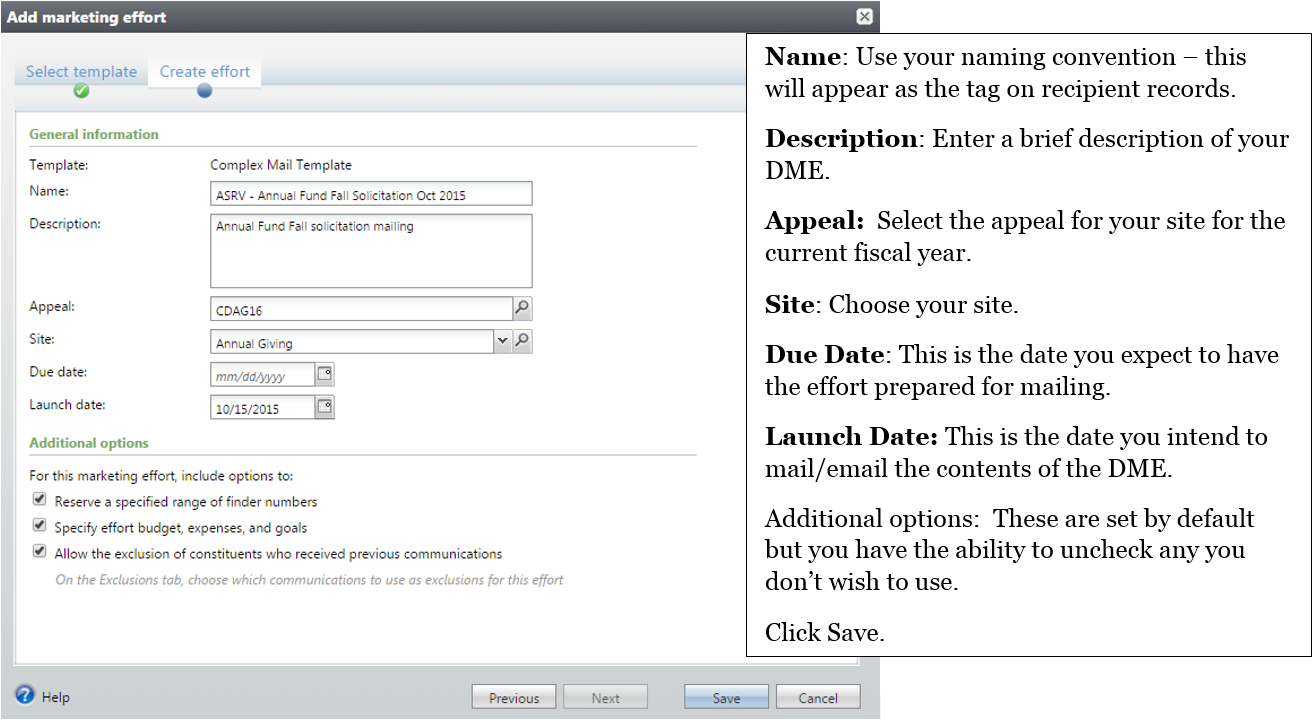
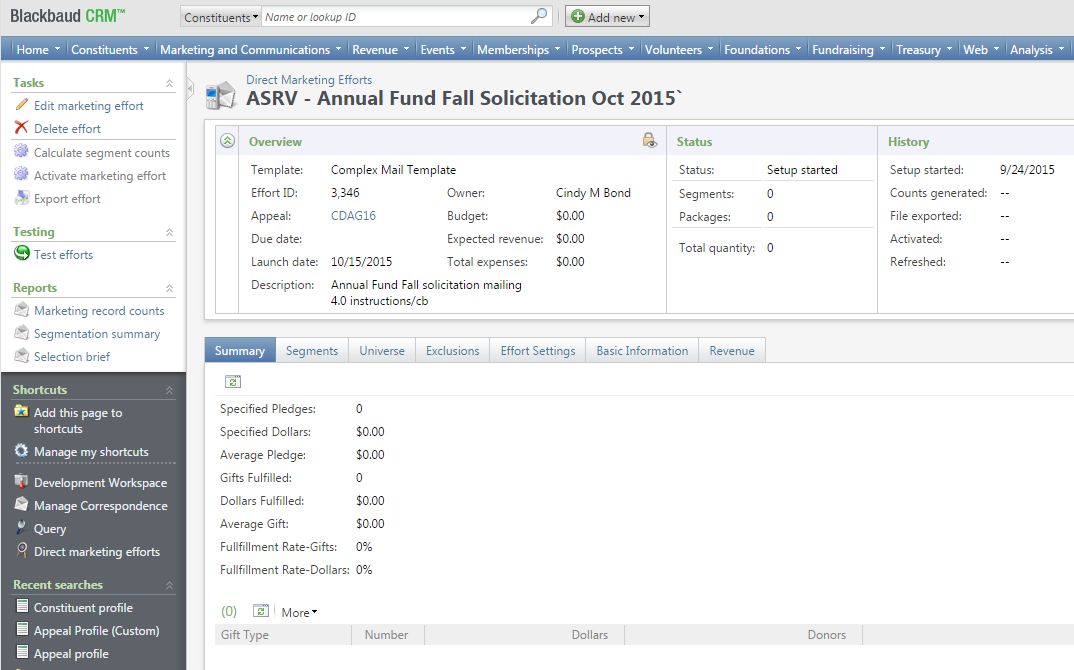
You will land on this page after clicking Save:
Step 4: Finalize Settings and Testing the Export
Effort Settings and Testing – Before you can test the effort you’ll need to add the Effort Settings and Segment(s) to tie to a package, then finish setting up the remaining mailing options.
EFFORT SETTINGS TAB
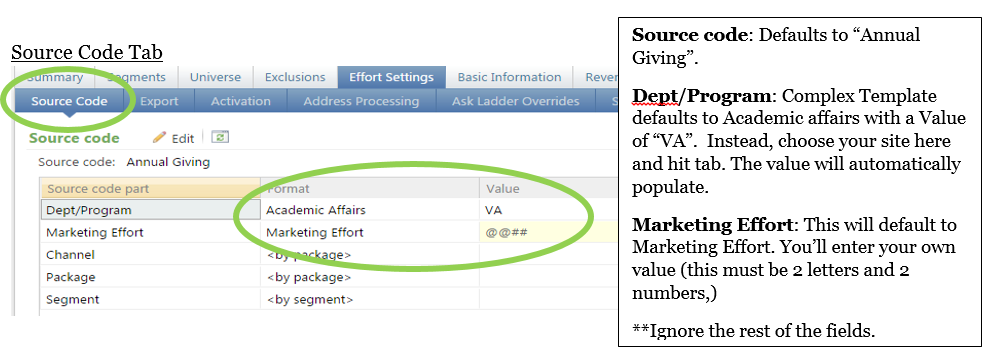
Source Code Tab
Export Tab – Review the default settings and click the Edit button to make any necessary changes, then click save.
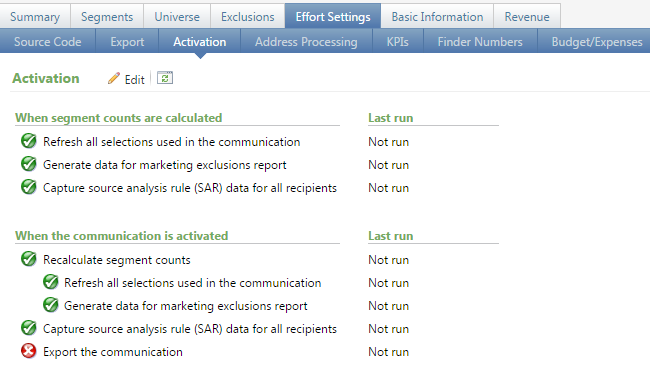
Activation Tab – You are allowed to change choices here, however, the defaults are pre-set with your needs in mind and should remain set as they are currently.
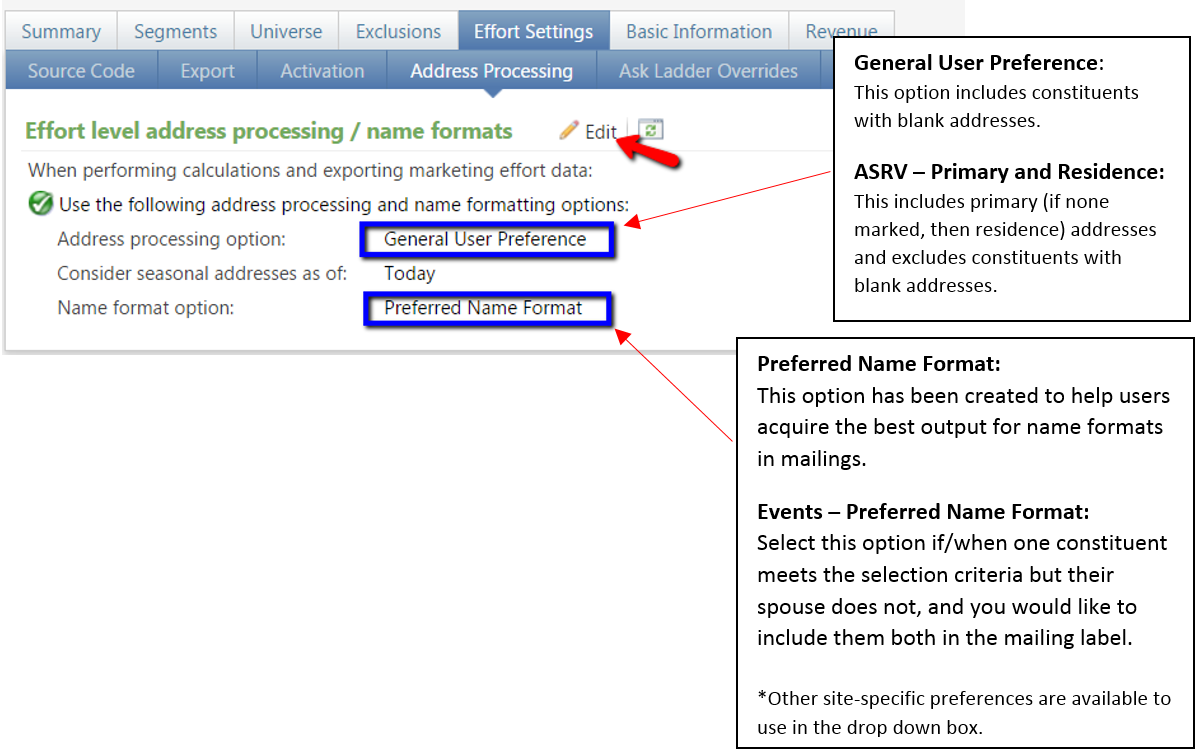
Address Processing Tab
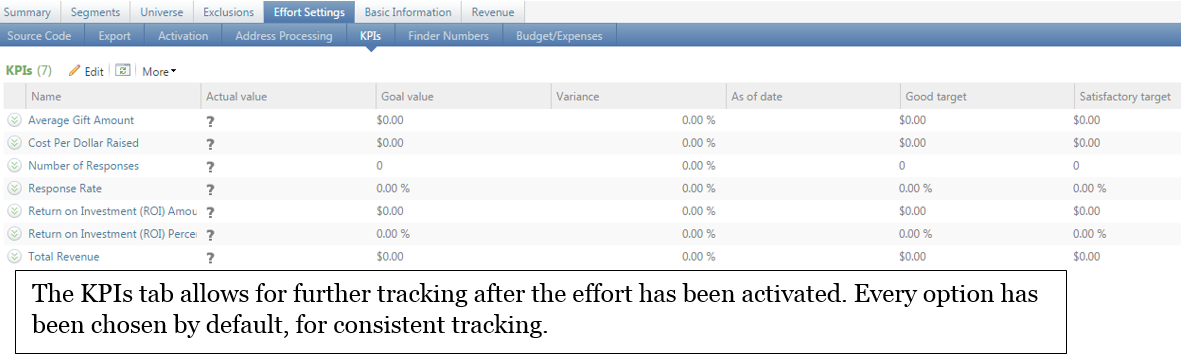
KPIs Tab
SEGMENTS TAB
Select the Segments tab. Click add and choose the constituent segment option for your placeholder and choose the constituent segment for your target audience.
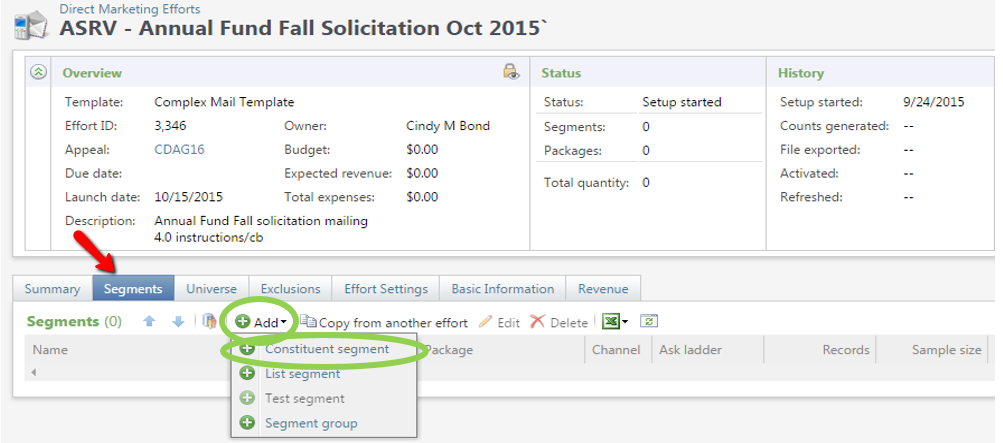

Click save when you’re finished.
UNIVERSE TAB
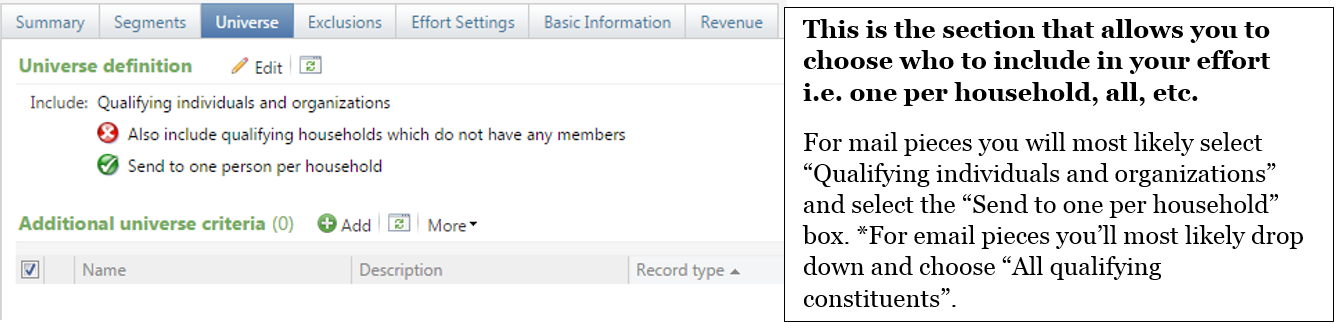
Tip: If you’re going to tag all records with this marketing effort, you’ll want to remove the check mark for “Send to one person per household” after you get your export and before you Activate the effort (final step).
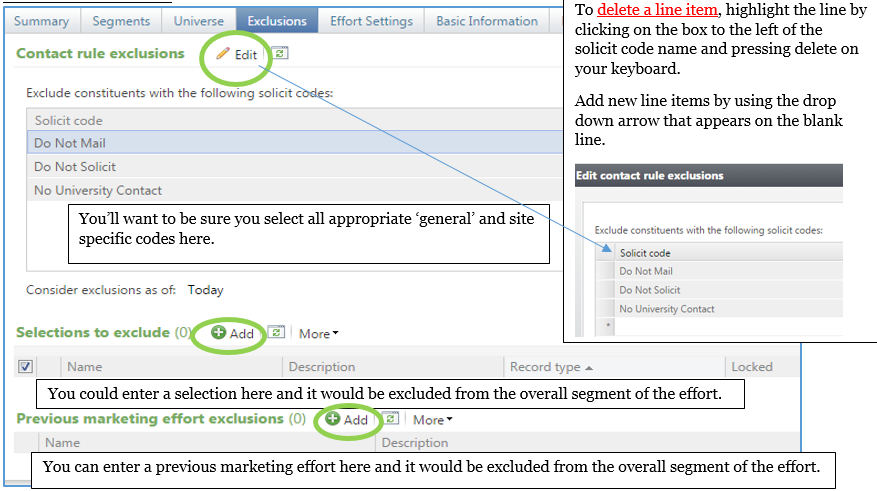
EXCLUSIONS TAB
Now you’re ready to test the effort and review the data. It’s important that you don’t skip this step as this is the way for you to verify your data before fully activating the effort.
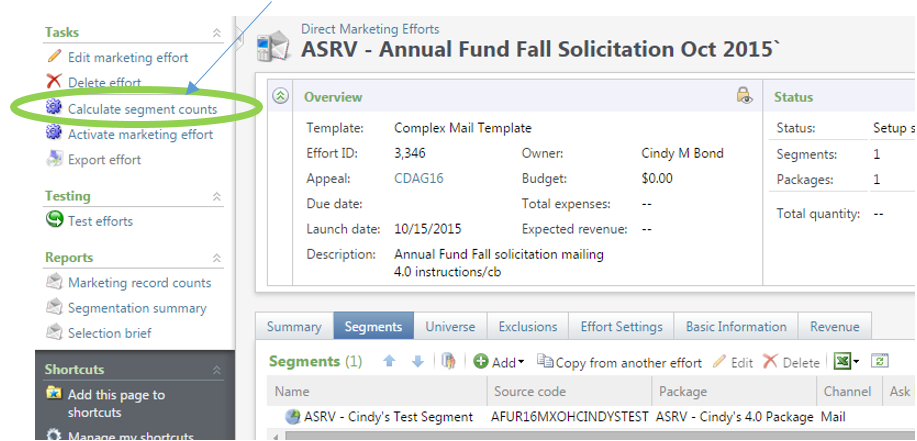
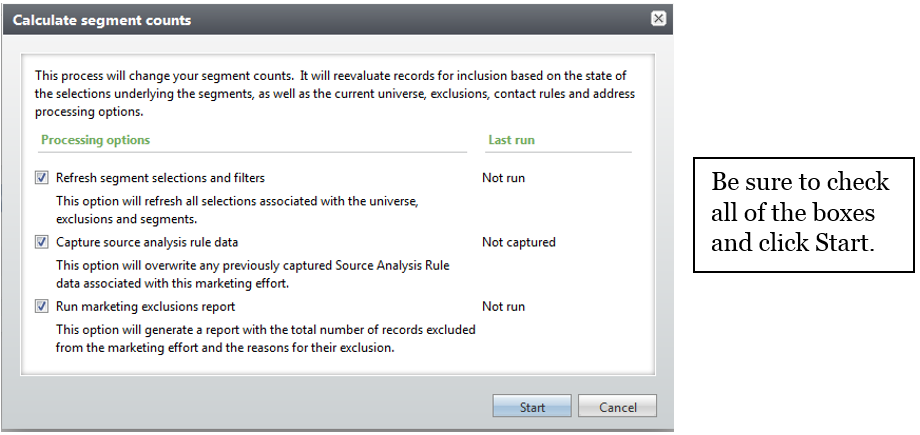
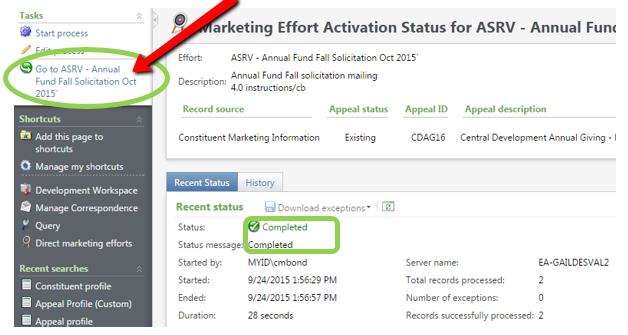
To test you’ll click “Calculate segment counts” found on the explorer bar.
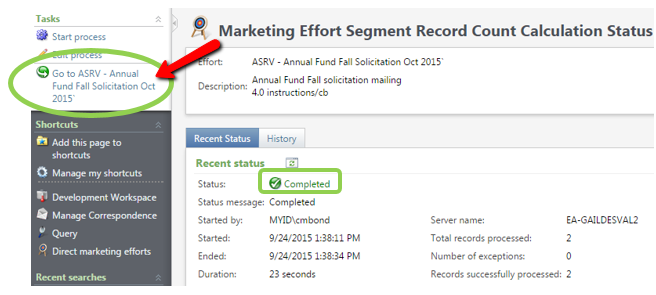
When the status indicates completion you’ll navigate back into the DME frame by clicking “Go to…”.
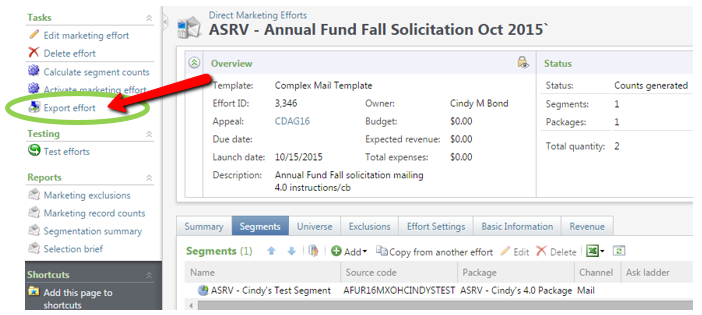
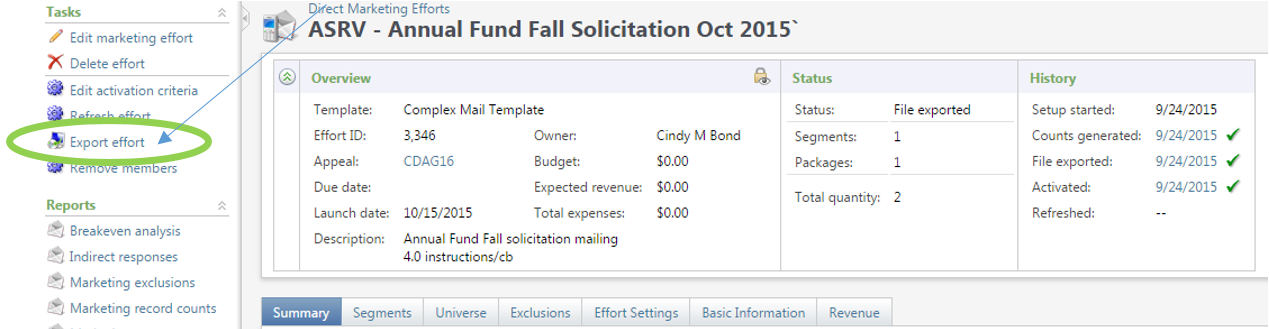
Once in the DME frame you’ll export the effort in order to review and check your data. Click “Export effort”.
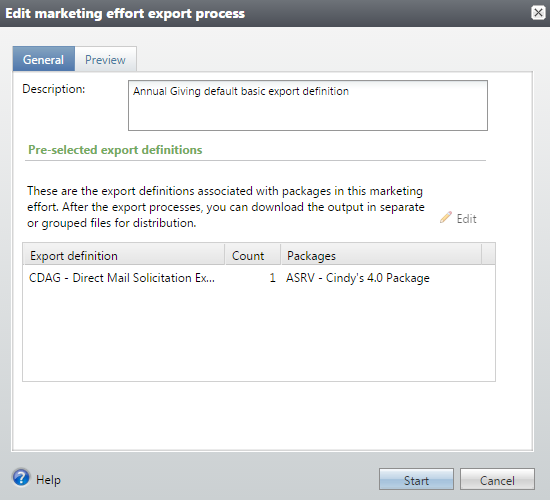
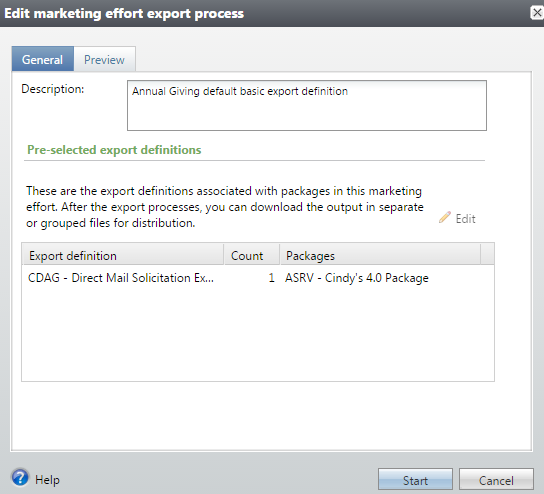
Enter a description if desired and click “start”.
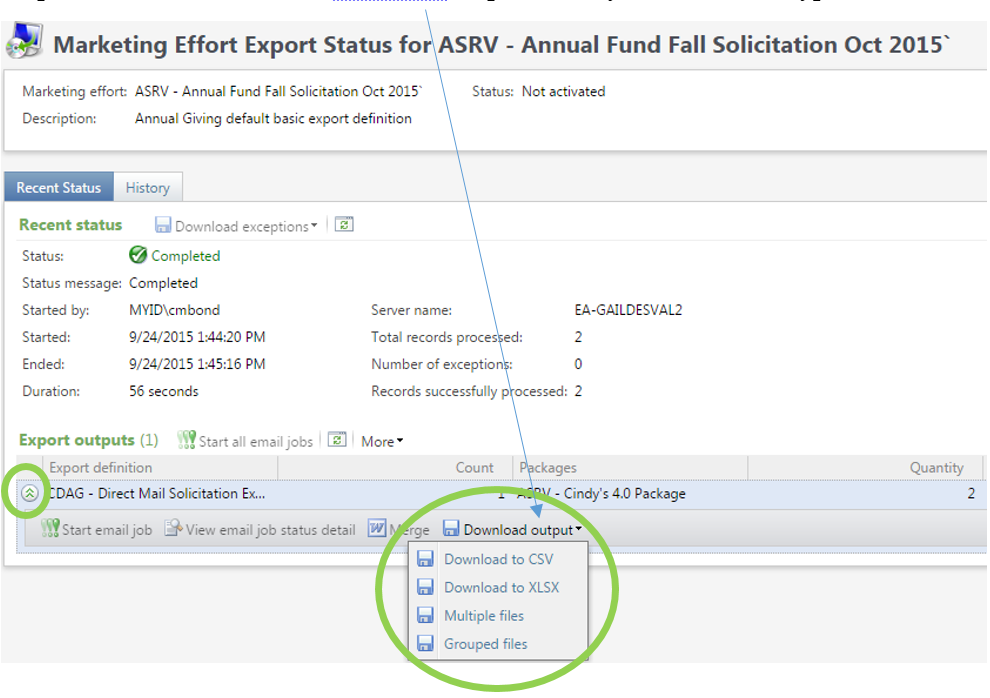
When the export shows a completion status you will click on the export definition name under the export outputs section and choose to Download output. Select your desired file type (XLSX is most common).
Check the constituent data in this exported file, if all looks right, proceed to the final step, Step 5. If you need to make changes, do so before proceeding to Step 5.

Step 5: Activate & Export the Direct Marketing Effort
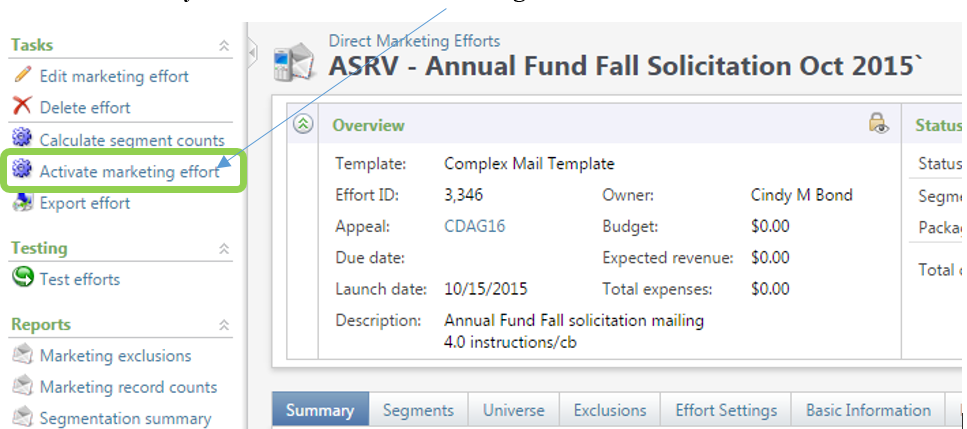
If you’re good with how the DME looked after testing it now is the time to activate the effort. For email efforts this will provide the email that will be sent to the selected recipients. For mail efforts, this will tie the contents of the package (the creatives) to the constituents. Activation follows the same steps as the calculation. From within the effort you’ll click “Activate marketing effort”.
Make sure you have your appeal listed here and that all of the boxes are checked.

When the status indicates completion you’ll navigate back into the DME frame by clicking “Go to…”.
Once in the DME frame you’ll export the effort in order to download your data and send the email (with Email efforts only).
Click “Export effort”.
Enter a description if desired and click “start”.
When the export shows a status of complete you will click on the export definition name under the export
outputs section and choose to Download output. Select your desired file type (XLSX is most common).

*Please ensure that a non-disclosure form has been signed before sharing information with an individual or vendor outside of GAIL. When sharing data all documents must be sent through the SendFiles application. http://support.dar.uga.edu/GAIL/ask-it/
Once the appropriate mandatory forms have been received, then you may use UGA’s secure file transmittal method of SENDFILES. Do not ever send GAIL data through regular email as it is not secure by any means.
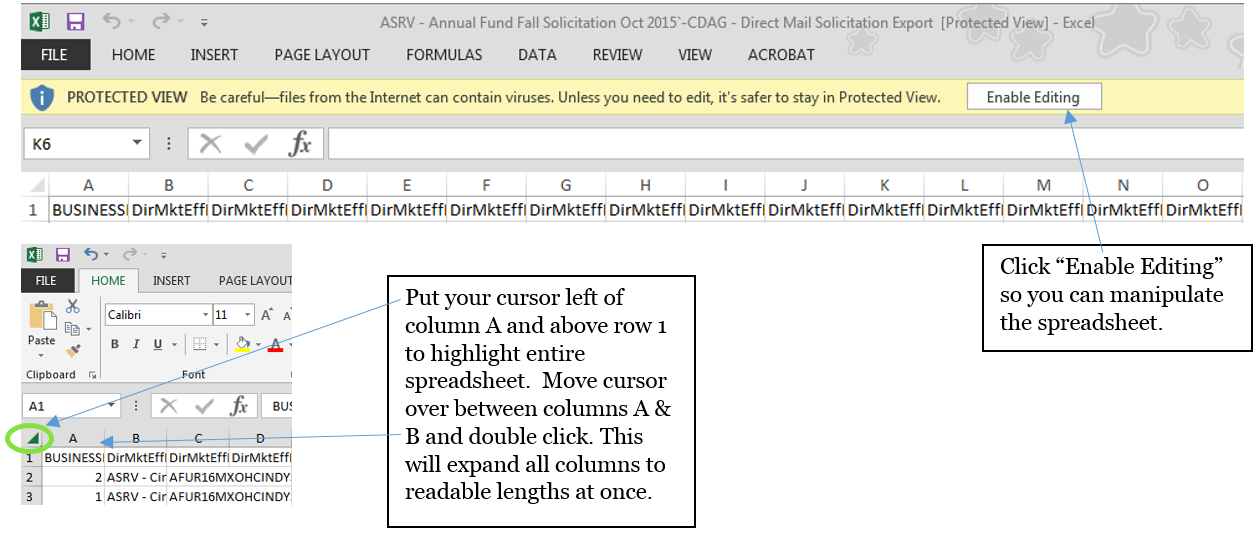
Example of what your XLSX export will look like: